
 MikroWizard
MikroWizard Device Onboarding Guide: Adding MikroTik & Multi-Vendor Network Devices
1. Overview of Device Management in MikroWizard #
MikroWizard provides a centralized management plane for both pure MikroTik RouterOS networks and mixed Multi-Vendor enterprise environments. The Devices section (/#/devices) is organized into two primary tabs:
- MikroTik Devices Tab: Dedicated to MikroTik RouterOS nodes (Cloud Hosted Routers, CCR, CRS, hEX). Supports automated Layer 2/IP discovery scans, RouterOS binary API & API-SSL communication, centralized firmware upgrades, configuration backups, and WebFig proxy integration.
- Other Brands (Non-MikroTik) Tab: Dedicated to Linux servers, Unix bastions, and third-party network hardware (Cisco, Huawei, Juniper, Fortinet, ZTE). Communicates over SSH or Telnet using connection templates and supports kernel-level PAM security agents.
2. Adding MikroTik RouterOS Devices #
When navigating to Devices from the main menu, the MikroTik tab is displayed by default:

Method A: Automated Network Scanner (Recommended for Fast Onboarding) #
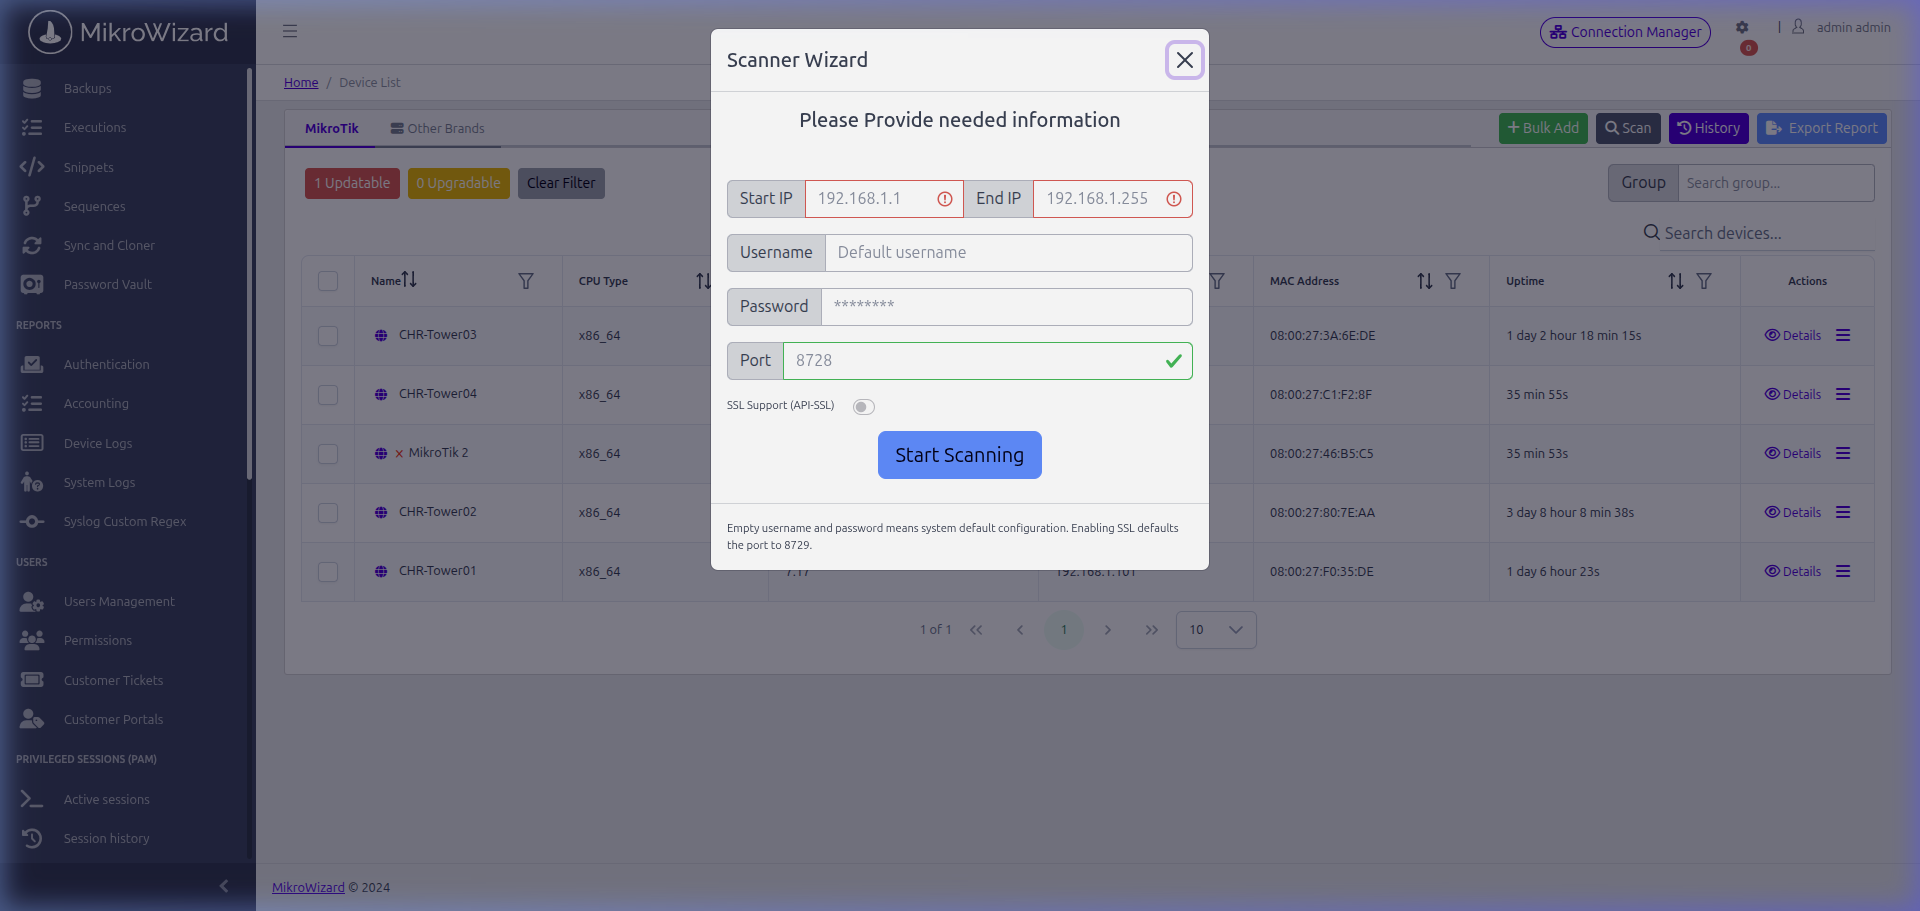
The built-in scanner automatically sweeps subnets and discovers MikroTik routers without manual IP entry:
- Click the Scan button in the top toolbar.
- Select your scanning method:
- TCP/IP Scan: Scans a designated IP range (e.g.
192.168.1.1to192.168.1.254). - Layer 2 Discovery Scan: Listens for MikroTik MNDP / CDP discovery broadcast packets across local network interfaces.
- TCP/IP Scan: Scans a designated IP range (e.g.
- Enter administrative credentials (Username and Password) configured on the routers.
- Specify the API Port (default:
8728for plaintext API, or8729for API-SSL). - Click Start Scan. Discovered devices appear in the results list where you can select and import them into your active fleet.
Method B: Bulk Adding MikroTik Devices via CSV #
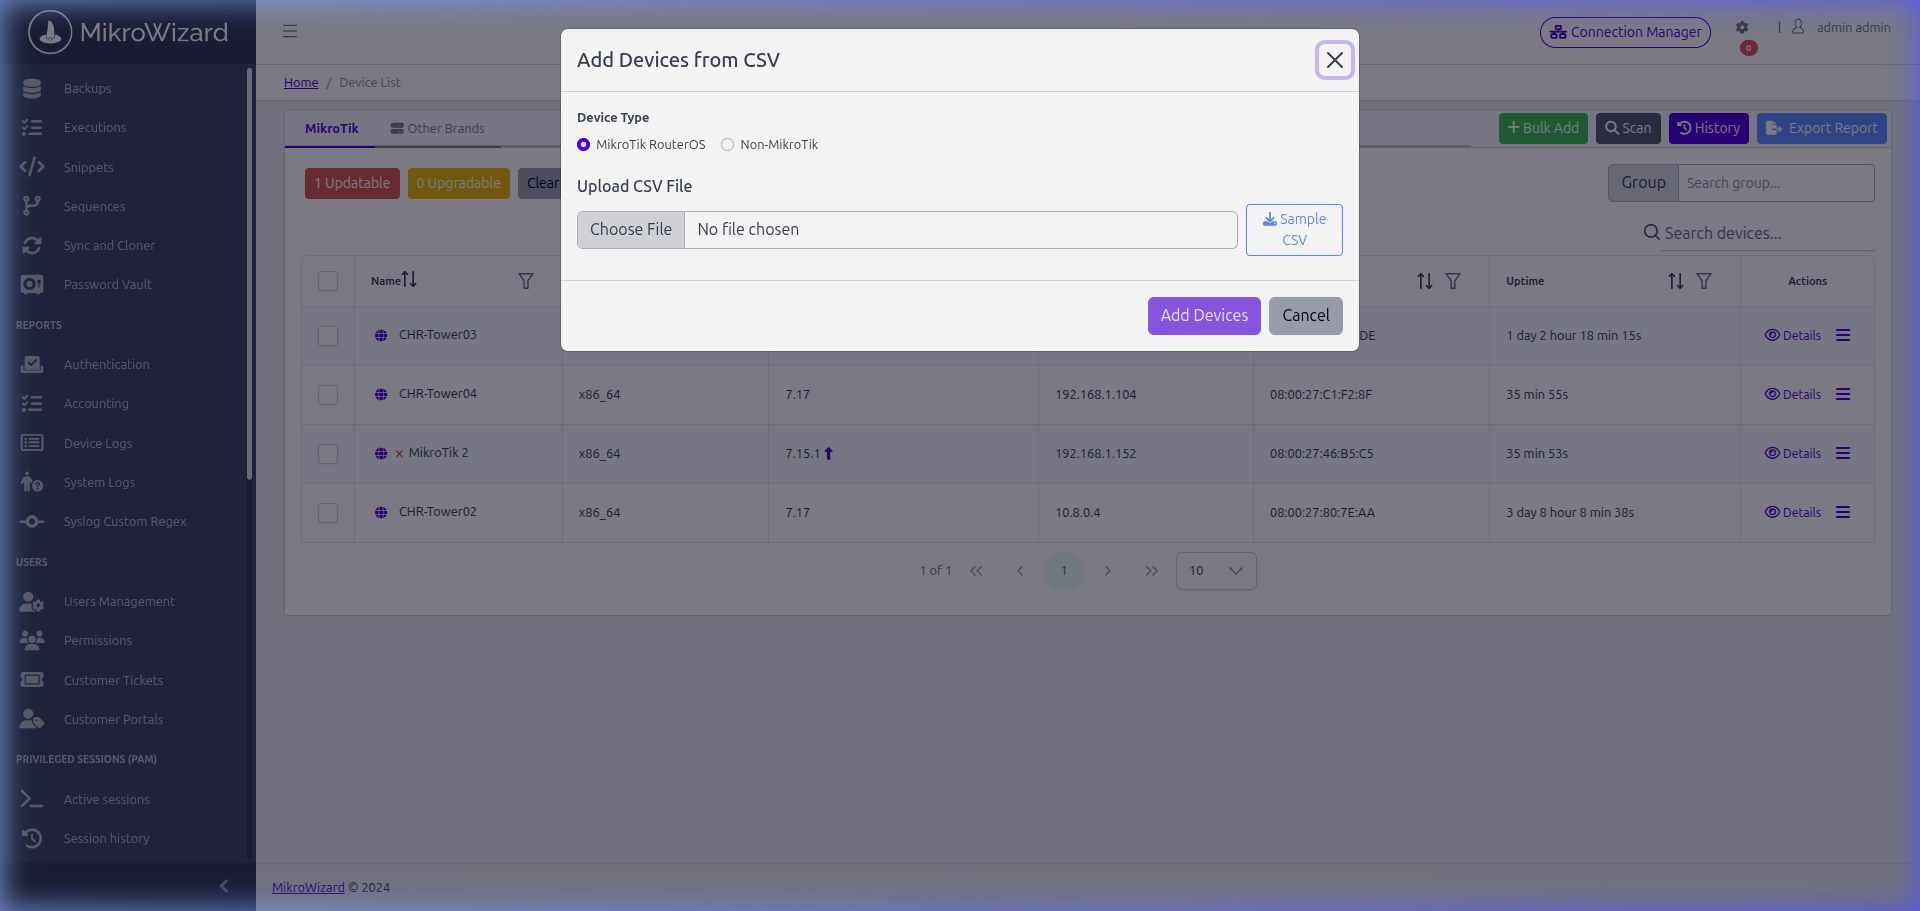
For importing existing asset spreadsheets or deploying large network fleets:
- Click the green Bulk Add button in the top toolbar.
- Ensure the MikroTik RouterOS radio button is selected under Device Type.
- Click Sample CSV to download the template with column headers:
ip,username,password,port. - Upload your populated CSV file.
- Verify the Column Mapping dropdowns (IP Address, Username, Password, API Port, and optional Group IDs).
- Click Validate & Import to register the devices.
Edit Device : #
To inspect or modify settings for an individual MikroTik router (such as lab router CHR-Tower01 at 192.168.1.101), click the action menu button in the device row and choose Edit Device:
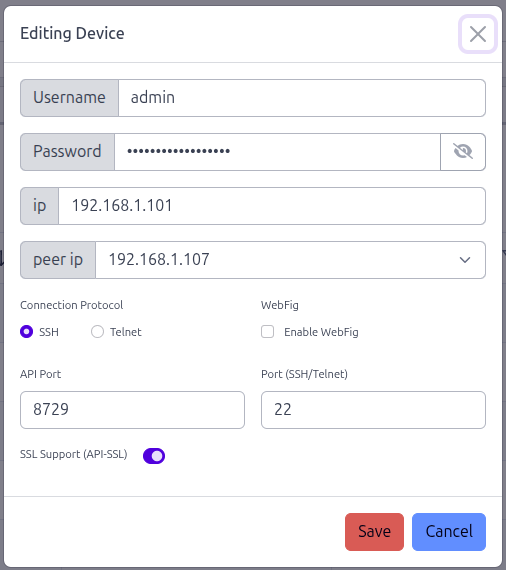
MikroTik Device Field Reference: #
| Field Name | Description & Recommended Setting |
|---|---|
| Username | RouterOS user account with appropriate API permissions (e.g. admin). |
| Password | Device administrative password (stored in encrypted vault). |
| IP Address | Primary management IPv4 or IPv6 address (e.g. 192.168.1.101). |
| Peer IP (WireGuard / VPN) | Optional secondary VPN/tunnel endpoint address for multi-homed routers. |
| MikroTik Protocol | CLI connection protocol for Web TTY sessions (SSH on port 22 or Telnet on port 23). |
| WebFig Integration | Radio toggle to enable or disable direct in-browser WebFig management. |
| API Port | RouterOS API listening port (default: 8728 for plaintext, 8729 for SSL). |
| Connection Port | SSH service port (default: 22). |
| API SSL Switch | Toggle switch to enforce TLS encrypted communication (Port 8729) with certificate verification. Recommended for production networks. |
3. Adding Other Non-MikroTik Brands (Linux, Cisco, etc.) #
To manage non-MikroTik hardware or Linux hosts, switch to the Other Brands tab at the top of the Devices view:

Method A: Single Device Addition (+ Add Device Button) #
Click the green Add Device button on the top-right of the Other Brands card to open the Add Non-MikroTik Device dialog:
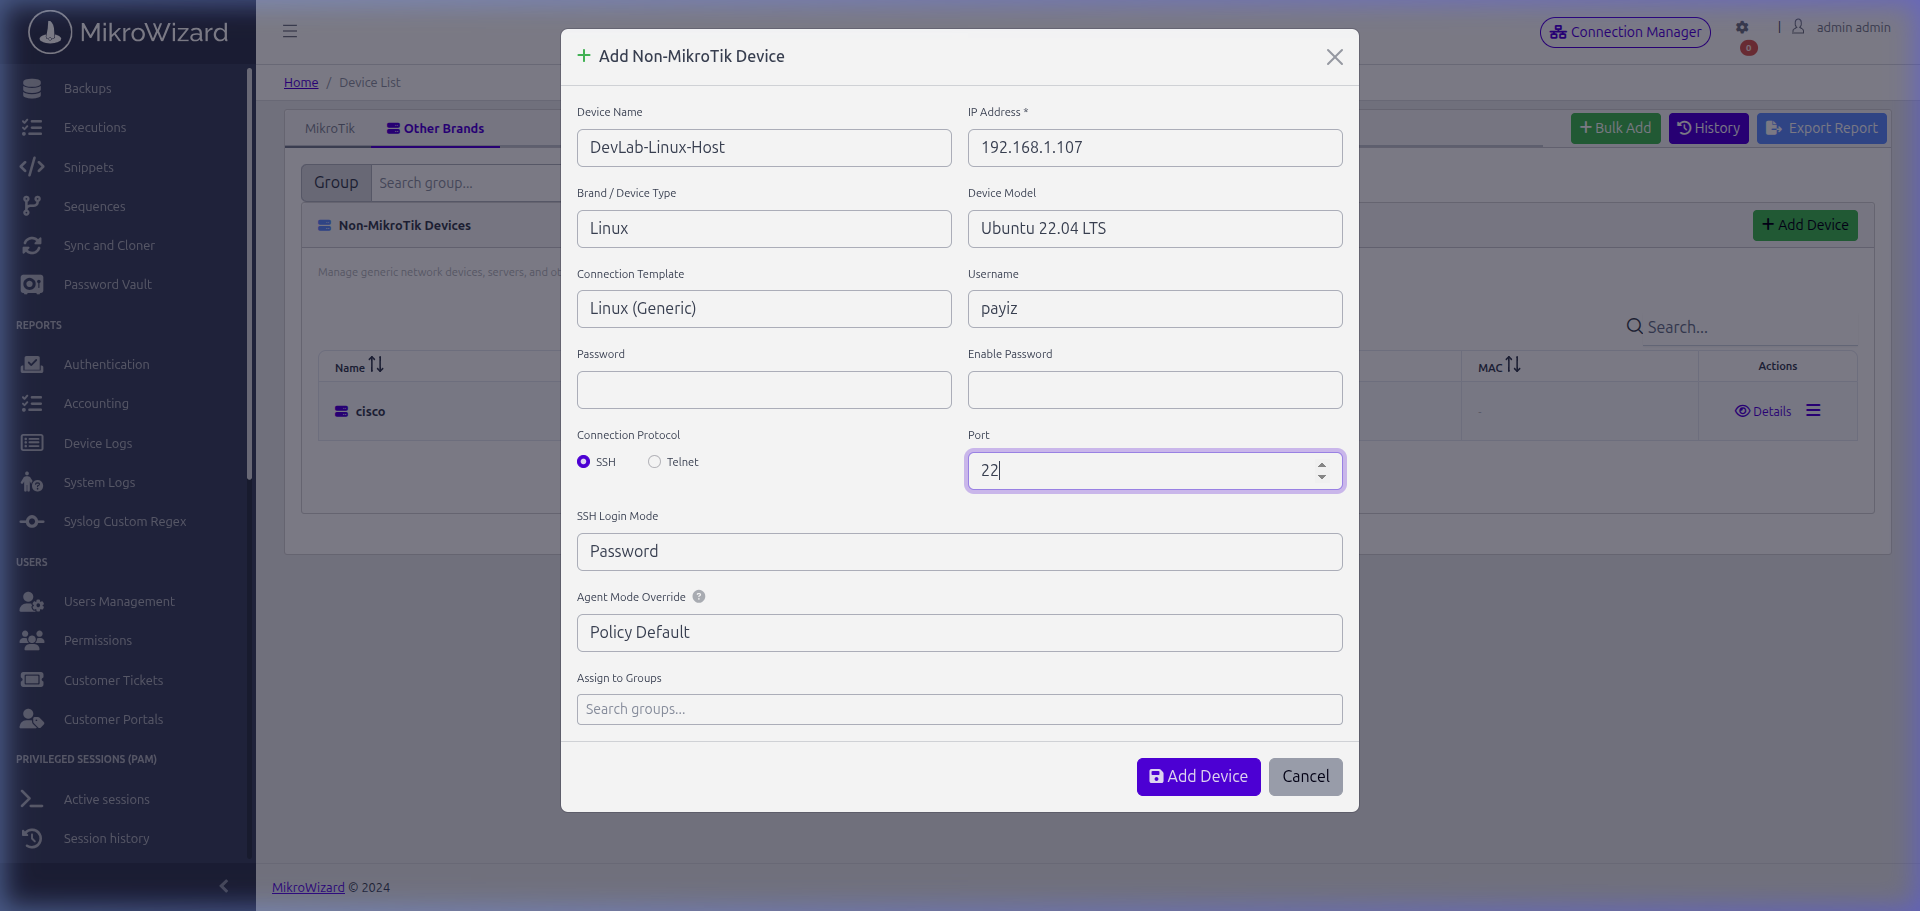
Non-MikroTik Device Field Reference: #
| Field Name | Required? | Description & Configuration Options |
|---|---|---|
| Device Name | Optional | Friendly descriptive label (e.g. DevLab-Linux-Host, Core-Switch-01). |
| IP Address | Yes | Host management IP (e.g. 192.168.1.107). |
| Brand / Device Type | Yes | Select vendor platform: Linux, Cisco, Huawei, ZTE, Juniper, Fortinet, Windows, Darwin, FreeBSD, or Generic. |
| Device Model | Optional | Hardware model or OS release (e.g. Ubuntu 22.04 LTS, WS-C2960, FortiGate-60F). |
| Connection Template | Yes | Pre-built prompt and terminal command profiles matching the selected brand (e.g. Linux (Generic), Cisco IOS). |
| Username | Yes | Account username for CLI authentication (e.g. payiz). |
| Password / SSH Key | Yes | Account password or multiline OpenSSH private key based on the selected SSH Login Mode. |
| Enable Password | Conditional | Privilege escalation secret (used on Cisco/Huawei devices requiring enable / super mode). |
| Connection Protocol | Yes | Radio selection between SSH (encrypted) and Telnet (legacy). |
| Port | Yes | Management port (defaults to 22 for SSH, 23 for Telnet). |
| SSH Login Mode | Optional | Select between Password authentication or SSH Key certificate authentication. |
| Agent Mode Override | Pro Feature | Overrides policy-level agent tier: Policy Default, No Agent, Strict Mode (Kernel ptrace on Linux, Interpreter on BSD), or Strict + Compatible. |
| Assign to Groups | Optional | Searchable multi-select chip input to assign the new device to Device Groups for policy binding. |
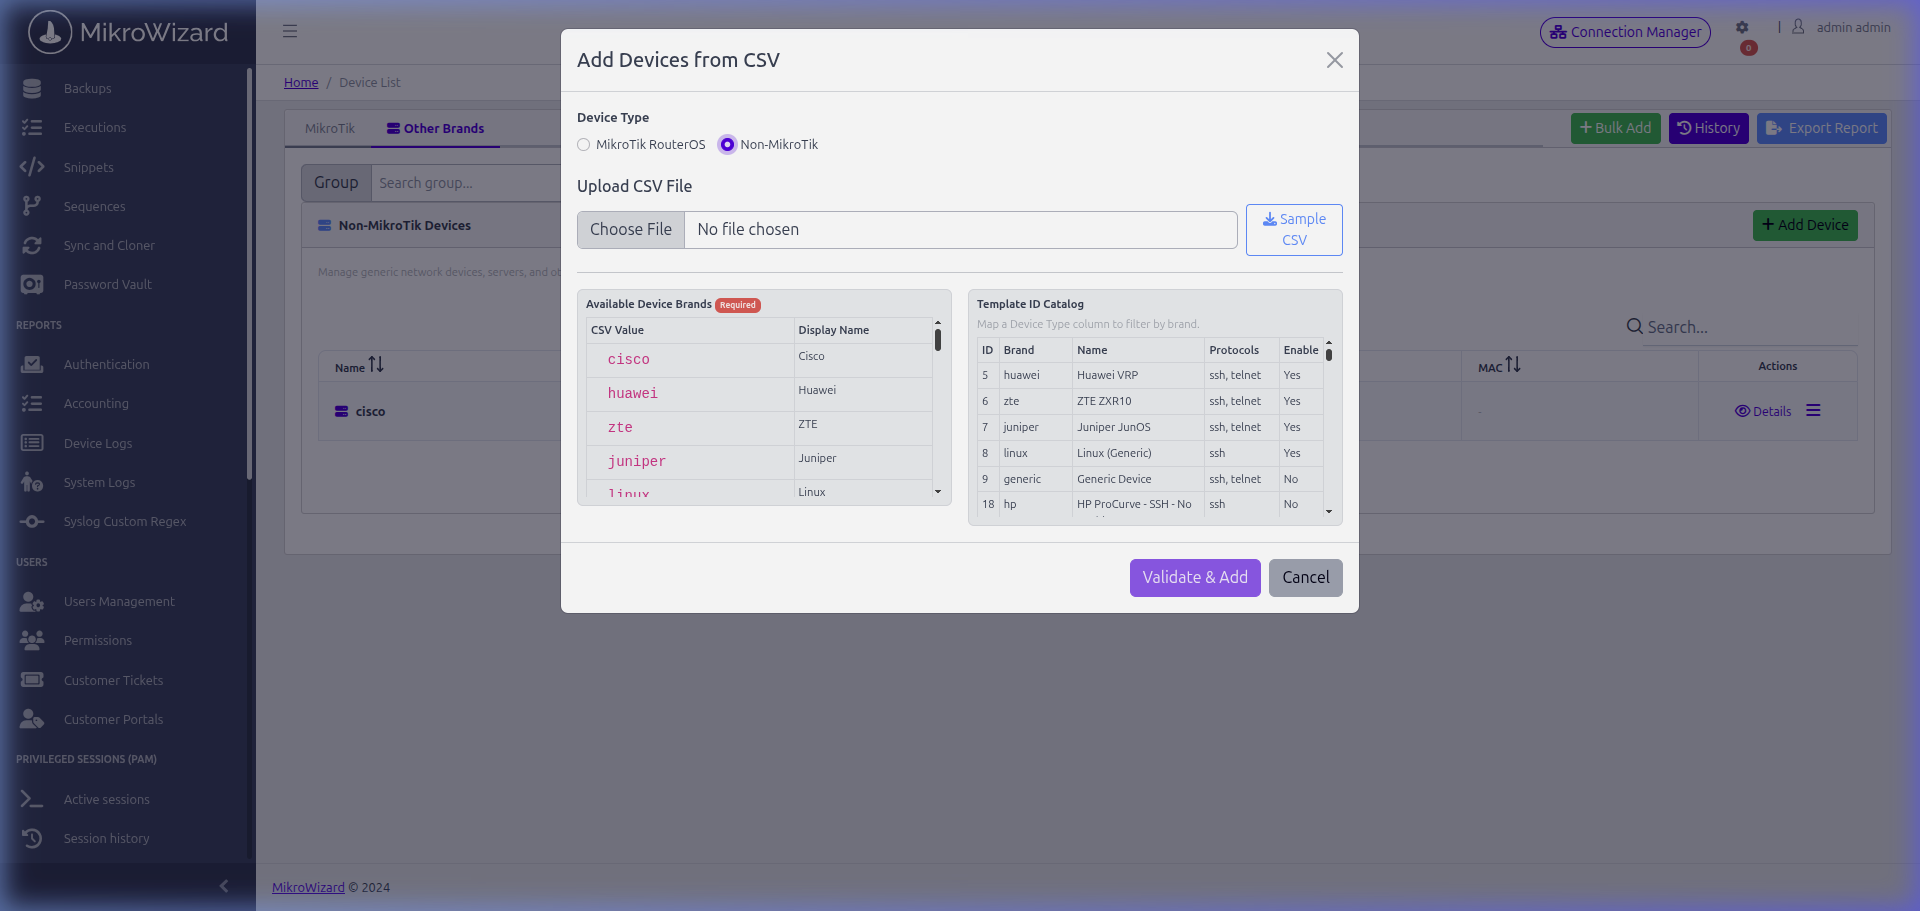
Method B: Bulk Adding Non-MikroTik Devices via CSV #
To import non-MikroTik devices in bulk:
- Click the Bulk Add button in the top toolbar and select the Non-MikroTik radio button.
- Download the sample CSV containing headers:
name,ip,username,password,device_type,template_id,protocol,port,enable_password,device_model. - Map your CSV columns to the required fields.
- Click Validate CSV to verify connection templates and brand mappings before importing.
4. Post-Onboarding Verification & Next Steps #
Once your devices are registered:
- Verify Connectivity: In the device row action menu (), click Device Details to view real-time ping latency, interface status, and uptime.
- Assign Terminal Security Policies: Navigate to Device Groups to bind command guardrails and PAM inspection rules to your newly added devices.
- Launch Web TTY Sessions: Navigate to Connection Manager (
/#/connection-manager) and click the black terminal icon () next to any device (e.g.CHR-Tower01or your Linux host) to start an audited, zero-trust CLI session.


